Smartifying and automating a cheap fog machine
-
 Mario Guggenberger
 - May 8, 2023 (updated May 10, 2023)
The cheapest fog machines typically come with a wired remote control with an indicator light and a button. The indicator light signals when the machine is at its operating temperature and ready to emit fog, and the button makes it emit fog while pressed. However, this turned out inconvenient once I found myself repeatedly running to the machine to trigger it. And even if it were wireless, it would still need manual handling. So this calls for automation, and it’s quite easily possible without DIY electronics, with a Wi-Fi Shelly switch and a relay. Read on for a demo video, build instructions, and a Home Assistant automation.
Hardware Analysis
The fog machine consists of its case, a fluid container, a heater to evaporate the fluid, a pump to transfer the fluid, a simple electrical circuit, and the external remote connected to the circuit. The circuit is protected by a fuse and toggled by a power switch. Two ceramic thermostat switches determine the temperature range in which fog can be emitted. While the temperature is below or above this range, the heater is either on for heating or off for cooling, and the remote is disabled. Within the range, a two-wire circuit to the remote is closed to light the indicator, and the button connects to an output wire which closes the circuit to the pump to run it. While the button can be pressed any time, the pump only runs while the remote is enabled.
Requirements
The basic idea is adding a Wi-Fi controller with a relay that connects to automation software like Node-RED or Home Assistant. It should be in parallel to the button to retain the offline operation mode and add the wireless mode as an enhancement. There should also be a sensor that detects when the machine is ready to fog.
This should be placed directly inside the fog machine where constant power is available. Placing it in the remote would be safer because it’s not heated, but it would only be powered while the indicator light is on. The controller would repeatedly boot, connect and disconnect (on power loss) during a fogging session, resulting in an unstable control interface with undesired side effects.
I was originally planning to go the full DIY route with an ESP controller and found this nice article about a smart fog controller with EspHome detailing exactly that, but after having all the parts in front of me, I reconsidered. It seemed like a lot of effort to assemble, safely isolate and place them within the tight available space (the space around the heater must stay clear for air circulation). There’s already so many off-the-shelf home automation products, doesn’t one fulfil my needs? It turned out there are many, and I decided on a Shelly 1. It saved me a lot of effort, it’s much smaller, safer, and even cheaper. 🙂
Shelly Configuration
It is best to configure the Shelly before installing it, otherwise you’ll be surprised with lots of fog the first time you turn it on, because the defaults make it act like the fogging button is constantly pressed. Follow the setup guide to connect it to your Wi-Fi, then:
Settings>POWER ON DEFAULT MODE> SelectSWITCH-Settings>BUTTON TYPE> SelectDetached Switch(important to decouple readiness detection from fogging switch)- Optional:
Settings>DEVICE NAME> Set user-friendly name, e.g. “Fog Machine” (displayed in Home Assistant) - Optional:
Settings>FIRMWARE UPDATE> Check for new firmware and install - Optional for Home Assistant:
Internet & Security>ADVANCED - DEVELOPER SETTINGS> SetCoIoT peerto<homeAssistantIp>:5683(recommended for faster state updates, see docs)
Hardware Installation
Required parts:
- 1x Shelly 1
- 1x AC relay (e.g. Finder 40.51.8.230.0000)
- 1x 6.3 mm flat plug
- 1x 6.3 mm flat plug with junction
- 3x splicing connector (e.g. WAGO 221)
- insulated electrical wire
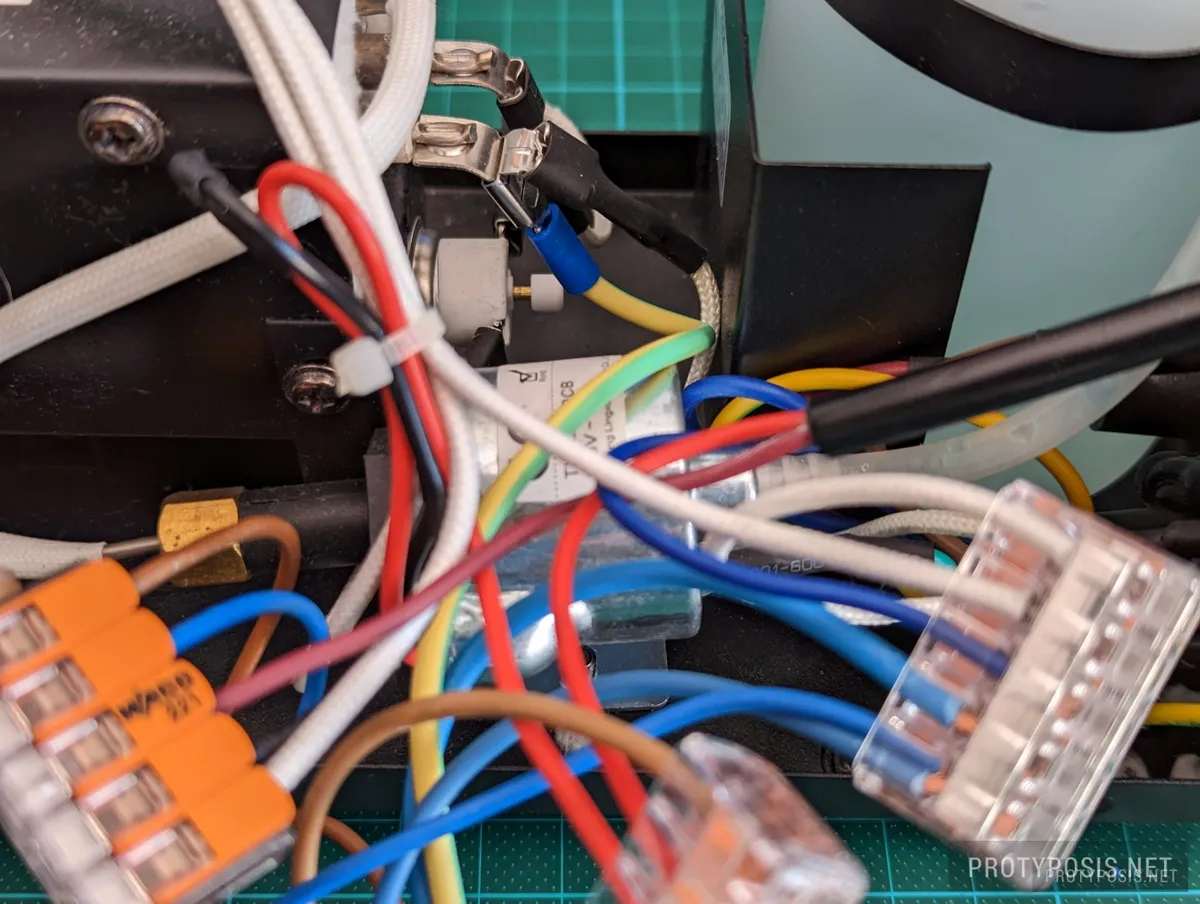
The installation connects to four wires of the circuit. The three to the remote, in my case blue, brown, and red, and continuous power from the power switch output:
- neutral (
N): blue remote wire, also directly connected to power switch output - live (
L): connects the second power switch output directly to the heater; can be easily split off the heater contact with a junctioned flat plug - brown remote wire (
BR): switched live wire for the indicator light (and pump) - red remote wire (
RR): button-switched neutral wire to the pump
Connect L and N to Shelly’s L and N terminals, N and RR to Shelly’s input (I) and output (O) terminals. Now, the Shelly can already remotely trigger fog.
Detecting if the indicator light is on is a little more tricky. Connecting BR directly to Shelly’s switch input (SW) terminal does not work because BR is always closed, and Shelly detects an open switch only if it is physically open (disconnected). This is solved with a mechanical relay where N and BR connect to the relay terminals A1 and A2 to switch it, and N passes through C (common/11) and NO (normally open/14) on to Shelly’s SW.
-
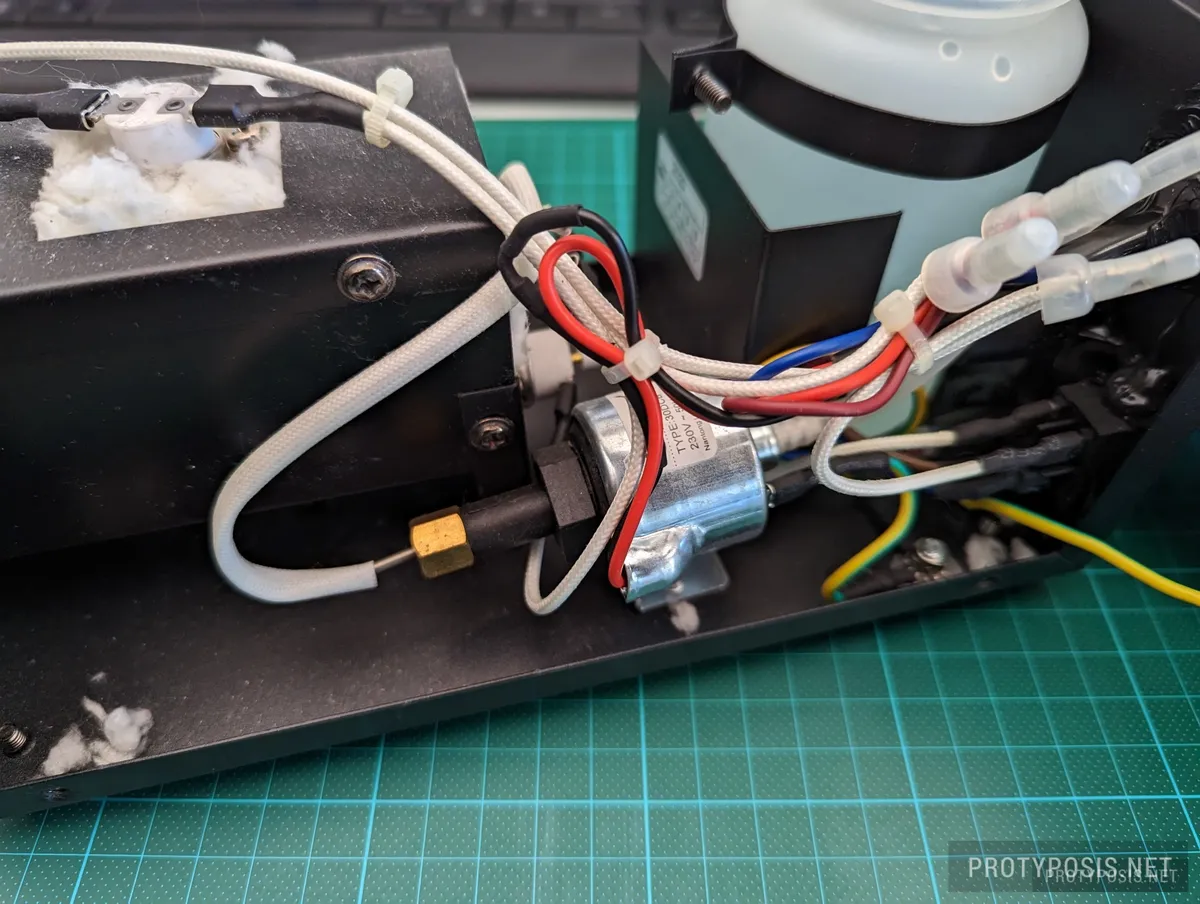
Original circuit -
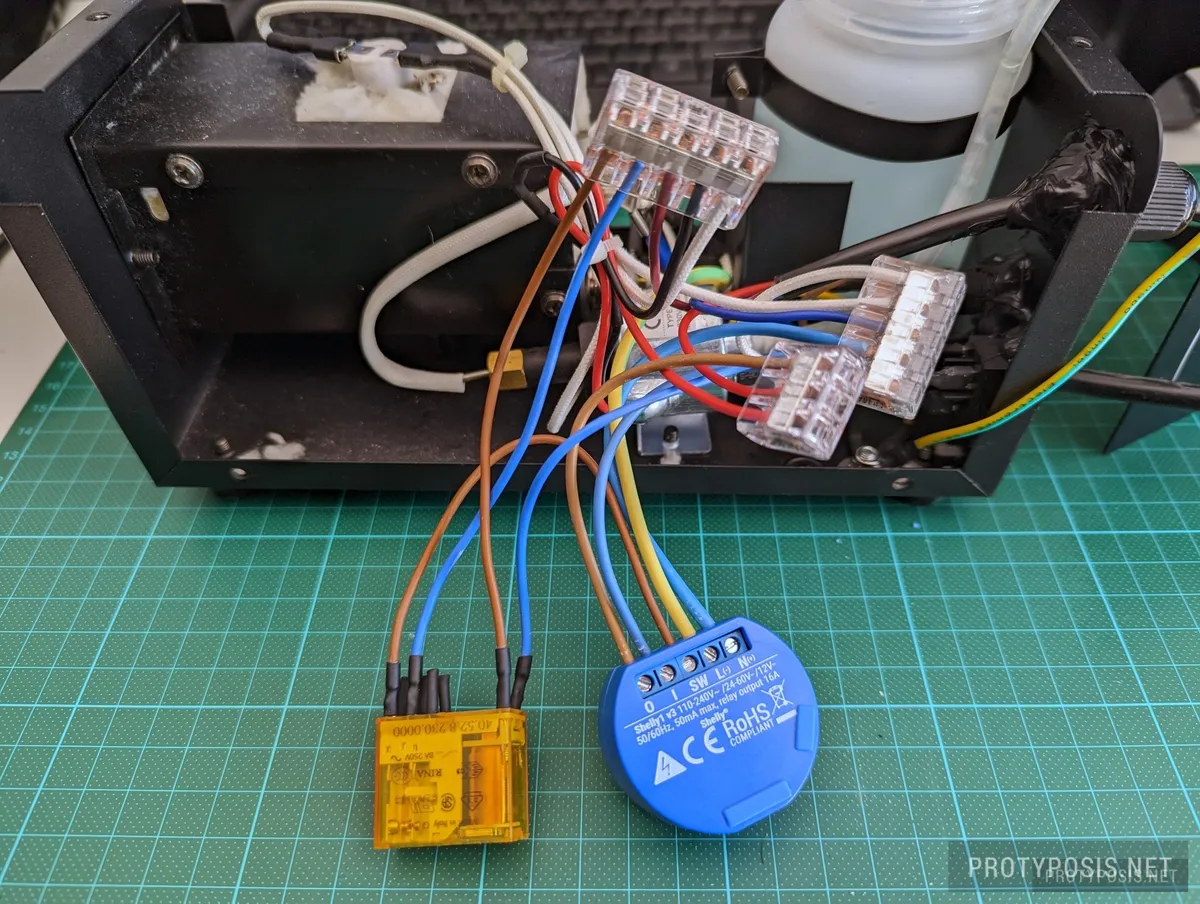
Shelly and relay installed -
Constant power split -
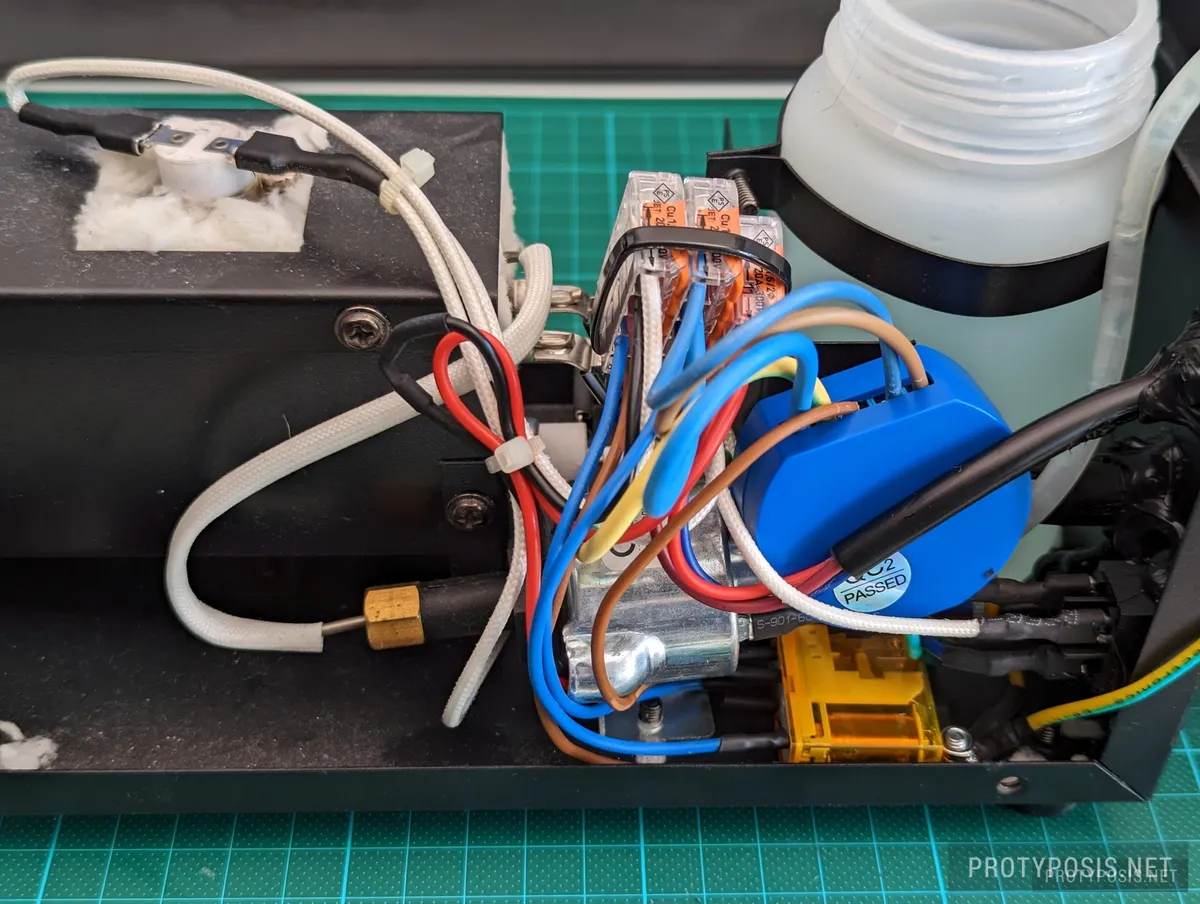
Final assembly
Place wires, connectors, Shelly and relay such that they neither stick into the air circulation area around the heater block not touch anything hot (see last picture). The danger zone is where fiberglass wire insulation is used. Take adequate safety measures when testing the functionality. It should now work like in the above video.
Example Automation
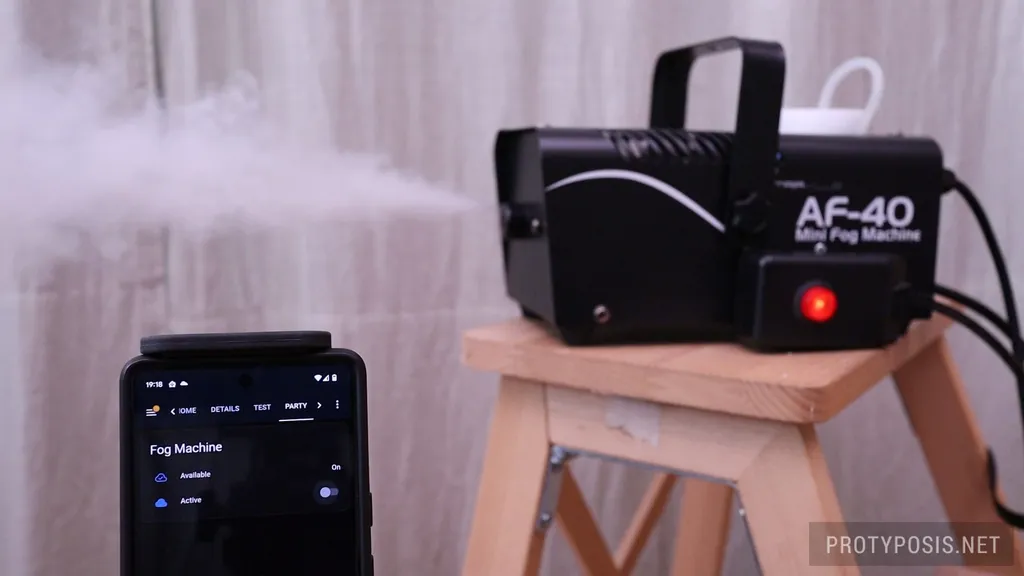
Home Assistant should automatically detect the fog machine as a Shelly device. Besides manual wireless control, it can now of course be integrated into automations. Here’s a simple example of a Home Assistant automation which emits fog in a regular interval:
alias: Auto fog
description: Makes the fog machine produce fog in a regular interval
variables:
  fogging_duration: "00:00:01"
  pause_duration: "00:01:00"
trigger:
  # This is a hack to use the activation state of the automation itself
  # to enable/disable fogging. It triggers the automation the next
  # second after enabling it. A non-hacky but more complicated
  # alternative is using a binary switch button helper entity.
  - platform: time_pattern
    seconds: /1
condition: []
action:
  - repeat:
      while:
        - condition: template
          value_template: "{{ true }}"
      sequence:
        # Delay fogging until the machine is ready (indicator light on)
        - wait_template: >-
            {{is_state('binary_sensor.stairville_af_40_mini_fog_mac_input', 'on')}}
        - service: switch.turn_on
          entity_id: switch.stairville_af_40_mini_fog_mac
        - delay: "{{fogging_duration}}"
        - service: switch.turn_off
          entity_id: switch.stairville_af_40_mini_fog_mac
        - delay: "{{pause_duration}}"
initial_state: false
mode: single
# Suppress warnings of repeated automation starts from trigger hack
max_exceeded: silent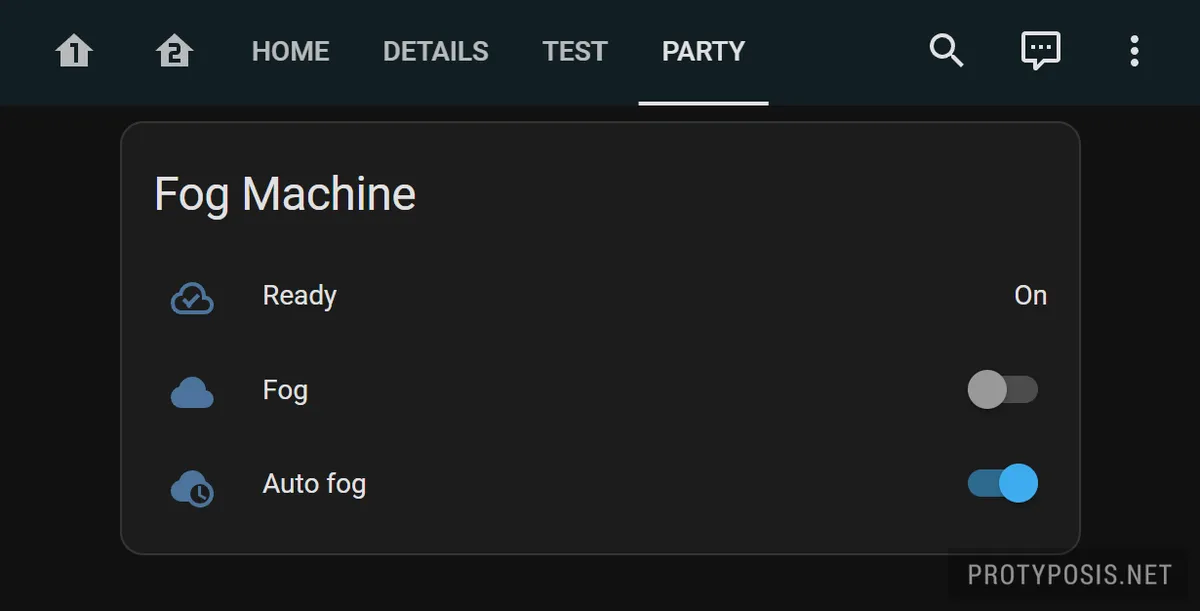
Happy fogging! ✌️